There are times when it is necessary to ship the AirCheck G2 out to a remote site to troubleshoot a wireless issue. By connecting the wired port on the side of the AirCheck G2 to the network and putting the unit into remote mode, it can be controlled using VNC. An even better configuration is to setup the AirCheck G2 to be remotely controlled wirelessly.
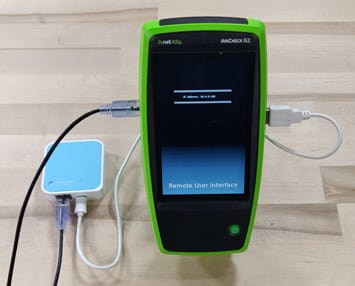
To do this, we are going to need a little travel router, such as the TP Link N300 Portable Nano Travel Router. This single port, wireless router will allow us to bridge between the wireless network and the AirCheck G2. This router, like many others, can be powered using a USB connection. For this setup, we will use one of the USB ports on the AirCheck G2 to power the router.
Most travel routers offer a number of different operating modes. These modes typically include NAT router, range extender, and bridge mode. For this configuration, we will configure the router to operate in bridge mode. This will allow the wired Ethernet port on the AirCheck G2 to get an IP address on the wireless network. As part of the configuration, the travel router will need to be configured to connect to the desired SSID and use the proper security method to connect to the wireless network.
Next, we will use a short Ethernet cable to connect the travel router to the AirCheck G2 and a short USB cable to power the travel router. When connecting the travel router to the AirCheck G2, it is a good idea to use USB port #1. This port is capable of providing 500ma of power to the connected device.
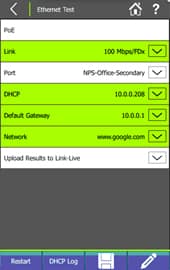
After the travel router powers up, it is a good idea to verify the AirCheck G2 can get an IP address and connect to the network. This may be accomplished by running the Ethernet Test from the Home screen. Here are the test results from our configuration:
In this case, we can see that the AirCheck G2 was able to connect to the travel router and obtain an IP address. It was also able to get out to the Internet and upload the results to Link-Live.
After verifying the AirCheck G2 is able to successfully obtain an IP address, it is time to put it in remote mode. This is accomplished by tapping on the Settings button at the bottom right of the screen and then scrolling down to Device Settings. From this screen, tapping on Remote User Interface will allow the AirCheck G2 to be controlled remotely using VNC. The screen on the AirCheck G2 will go black and display the IP address used to access the unit. This address may be entered into VNC.
The use of this configuration allows the AirCheck G2 to be untethered from a wired Ethernet connection when used remotely. The unit may be moved around the remote location by onsite personnel. This provides a means to get an analyzer on the problem quickly and get to the root of the problem, reducing downtime at the remote office.